Tips For Water Damage Drywall Repair
 If your Long Island home was constructed in the early 60s, your ceiling and walls are most likely made of some kind of drywall material. Often referred to as wallboard, sheetrock or plasterboard, drywall is made of gypsum-based plaster that is sandwiched between to paper sheets. Depending on the use, gypsum can be mixed with other materials to reduce water absorption, flammability and mold growth.
Any water event can damage your drywall, but water wicking is probably the biggest cause of drywall water damage. This occurs when water sips into your house and stays against the wall for an extended period of time. The longer it sits, the bigger the damage and while it’s possible to dry the drywall, you may need to cut out and replace it.
Repairing Drywall Water Damage
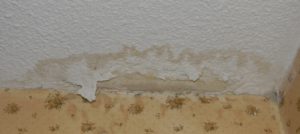
There are various signs of drywall water damage, including sagging walls, peeling paint, discoloration, bubbles and yellow-brown stains.
Here are the steps for water damaged drywall repair:
Locate the Water Damage Source
Before you can fix the drywall, you need to find the source of the water. If you have had a plumbing issue, it’s advisable to turn of your water supply line in order to halt water flow. Small leaks can be repaired without turning off the supply. For a flood, you should wait until the storm or flood waters have passed.
Extract the Standing Water
Once the flow stops, the next step is to begin extracting the water. You can use towels or buckets, but a pump is usually more efficient. You can rent a water pump if you do not own one. No matter the method you utilize, the goal is to do the extracting as quickly as possible as the longer it sits, the more damage your drywall will experience.
Remove the Damaged Materials
The next step is to remove any damaged materials. If your drywall is already sagging, crumbling or cracked, it is best to remove it. If it’s only damp, it’s possible to dry it. When removing the drywall, you should make clean cuts of at least 2’’ away from the damaged area. Depending on the damage extent, you might have to remove flooring, damaged wall studs, ceilings as well as cabinets.
Dry The Water Damaged Walls
Drying the area to prevent mold growth or additional damage is the next step. It’s advisable to utilize dehumidifiers and high-efficiency blowers. If you need this equipment, you can ideally rent it at the local rental company. Let the blowers work until studs and drywall are entirely dry. Keep the area well ventilated and humidity low. However, avoid cranking up the heat as it can cause mold to grow.
Hang New Drywall
For smaller parts, it is possible to patch the damage with joint compound, which is readily available at a local hardware store. In some situations, you may have to apply some drywall tape too. As for large sections, you’ll have to hang new drywall. Just cut the drywall a bit smaller than the damaged section and utilize drywall screws in order to secure the wall studs. Then use joint compound and drywall tape to blend it in with the drywall that’s already in place. Depending on your skills, you may have to apply joint compound as well as sand the section a few times to get a smooth surface.
Paint/Wallpaper the Area You Have Restored
The final step in repairing water damaged drywall is to paint or wallpaper the restored area. When painting, consider painting the whole wall for a more uniform result. As for hanging new wallpaper, it’s advisable to first remove the existing one even for the undamaged sections. You should always follow the manufacturer’s instructions when it comes to applying paint as well as wallpaper glue.