DIY Process For Repairing A Water Damaged Ceiling
 The majority of homeowners would agree that one of the most frustrating issues facing them is ceiling repair.
This frustration can be magnified if the damage is the result of water, and it stems from the fact that a lot of money may need to be spent to repair or replace the ceiling. The final cost depends on how much damage is present.
Sheetrock and plaster are the two materials that are used for the construction of most ceilings in the United States. Unfortunately, these materials are subject to the build-up of water on their surfaces. Once water begins to saturate the surface of the plaster or sheetrock, the material can begin to swell and leak. As a result, the ceiling can become so damaged that it can collapse and jeopardize the structural integrity of the house.
The most effective solution is to hire a company that specializes in water damage repair. Water extraction companies specialize in repairing areas damaged by water, and the contractors have the experience and knowledge to prevent mold outbreaks in the damaged area.
Even though it is recommended that you hire professional contractors to repair the water-damaged ceiling on your house, there are some steps you can take if you decide to tackle the repair job on your own.
Do-It-Yourself Ceiling Water Damage Repair
Step #1: locate all areas where leaks may be coming from
Step #2: protect (cover) your furniture and valuables
Step #3: dry out the affected area
Step #4: Remove the areas of the ceiling that have been damaged
Step #5: Repair the ceiling
Step #6: Paint the ceiling
Locate The Leak
Water damage on the ceiling typically results from a leak. This means that the first step you should complete is to locate all areas where leaks may be coming from. It is important to ensure that all leaks are found so they can be repaired. If not, there is a high probability that leaks can occur after the repair has been completed.
So, how can you locate a ceiling leak? Although it may seem like a simple enough exercise, you will likely go through a series of trial and error to find the water leaks. Did you know that the location where the water entered the home may not be the actual source of the leak?
Water flows through the easiest path it can find in order to reach the lowest area of obstruction. This is the point where it will begin to pool and leak. It is important to perform a complete inspection and then eliminate the most common causes. You can use this information as a starting point.
Dry The Damaged Area
The next step involves drying out the affected area. However, before you begin this process, make sure that all of your furniture and valuables are protected. The floors should also be protected with tarps. A vacuum or a towel can be used to dry excess water from the ceiling. Be sure to clean the exterior and interior of the ceiling.
You can then begin to remove the excess water from the ceiling by stabbing through the ceiling. This process will allow excess water to pour down. It is important to do this so mold and mildew will not have the opportunity to develop.
Remove the areas of the ceiling that have been damaged. These areas can be identified by areas of the ceiling that are bulging or loose. The damaged areas may need to be scraped away. Paint scrapers or knives can be used to remove the water damaged areas.
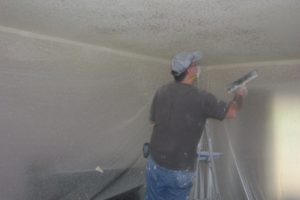
Repair And Paint
The next two steps involve repairing the ceiling and painting the ceiling. It is during this stage where the drywall may also need to be repaired.
Applying a primer coat on the stained or repaired drywall is the final step. The coat of primer will need some time to dry. You may need to apply a second coat, but this will depend on how visible the stain is.
Depending on the situation, water damaged ceiling repair may be covered by your home insurance policy. If you are not able to complete the repair yourself, hire a professional water extraction and repair company to do so. They have the expertise and knowledge necessary to assess the damage and make the correct repairs to your ceiling.